If you want to create an overlay in which you want to target particular segments of visitors and show them personalized messages, you’ve come to the right place. An overlay can be a pop-up, a ribbon or interstitial that is triggered in specific moments (e.g. : when the visitor wants to leave the webpage). Here is how you can create your first Overlay experiment.
Step 1. Creating a new Overlay
From the top left menu select the Overlay option.

In the next window choose the option New Overlay.

Step 2. Choosing and editing a template
In the next step, you will choose your overlay template. You can filter the available templates by selecting the category and the template type from the list on the left or create your custom personalized one, using the Javascript template.

After that, a new window will appear from which you will have to choose how would you like the experiment to be triggered based on your objective. There are three possibilities :
- On Load: The on load trigger means that the interaction type experiment will appear after the page is loaded.
This feature comes with a delay option that can be set up in the Creative. - On Exit: The on exit trigger means that the interaction type experiment will be shown to the visitor the second he tries to exit the page by moving the mouse towards the URL bar or the tab’s/browser’s close button.
- On Scroll: The on scroll trigger is used when you want to show the experiment after the visitor scrolls down a certain percentage of your page. So if you set it up at 50% it means that after the visitor scrolls down half of the page the interaction will be triggered for him.

In the variation editor, you can apply modifications to the overlay, such as changing the text font, color or size and personalizing the message using custom variables, custom attributes or OnPage Variables. These options are unlocked once you press on an element from the overlay.

On the left side menu, in Design, you will find additional options to adjust the overlay, such as changing the color, the opacity or the background. You can also set the button to redirect to a specified URL, close the overlay or trigger an experiment. Some templates include both a Submit button and an Exit button, both being customizable.

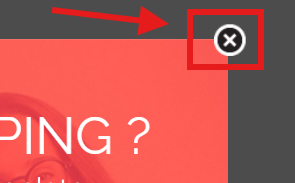
Please bear in mind that the Exit button does not refer to the ‘X‘ button in the upper right corner of the overlay, but the button which allows you to ‘deny’ the overlay offer, which is only present on some of the templates.

In the Settings area you can set a name for your template, decide if you want to show the ‘X‘ button (located on the upper right corner of the overlay).
You can also set the amount of time you want to pass before the overlay shows up after being triggered and how long it will stay on screen before it will auto-close. Leaving this values as 0 means the overlay will start when it is triggered and it will never auto-close.
You can also choose an animation for the overlay, and you can customize it’s direction.

Some overlay templates include a Lead Collector that you can also adjust according to your needs. You can collect information such as name, e-mail or phone, and mark it as mandatory or not. You can also set up the leads to be sent to Email, Webhook, Campaign Monitor, GetResponse, Freshmail, Mailchimp and Zapier. Collect location information can also be enabled from here.

You can also set a personalized Thank you message for this lead collector, as well as choose a specific action for when the button is being pressed.

What is more, if you want to apply certain modifications to the overlay that are not available in the design editor, you can use the code editor to enter your own custom code. You will find it at the bottom of the page, by clicking on the </> Code Editor button.

Also, you can switch between different device types to preview the overlay.

Step 3. Setting the Audience
After you have designed the overlay, the next step is to choose your Audience. That means that you must manage the pages where you want to run this experiment and select the Segment (Target) of visitors you want to see the experiment.
To select the pages where you want to run the experiment you can choose from different conditions for the URL :
- URL is: Using this the survey will run only on the exact page introduced in the value field next to the condition
- URL is not: Using this the survey will run on all the other pages but the one introduced in the value field next to the condition
- URL starts with: With this condition, the survey will run on all the pages that have an URL which starts with the same value as inserted in the value field
- URL ends with: The survey will run on all the pages that have an URL which ends with the same value as inserted in the value field next to the condition
- URL contains: Using this condition the survey will run on all the pages that contain in their URL the same value as the one inserted in the value field
- URL does not contain: Using this condition the survey will run on all the pages that do not contain in their URL the value entered in the value field
- URL RegEx: Using this you can define with RegEx the pages where you want the survey to run
- Page contains keyword: With this, the survey will run only on the pages that contain the keyword or keywords in a small sentence/grouped format
This is an example of a product description
This is an awesome product with awesome features at half of the price of other providers.
Correct keyword to use: awesome product Not correct keyword to use: awesome providers
If you don’t have a large amount of traffic on your website, we recommend you to add multiple pages in the test. This can be done by pressing the ‘+‘ button on the right.
When you do this you must add only the pages that have the same structure as in case of an e-commerce website where all of the product pages look similar.

The same applies for Excluded URL pages, useful if you want the experiment to apply to multiple pages with few exceptions.
Step 4. Setting the segmentation
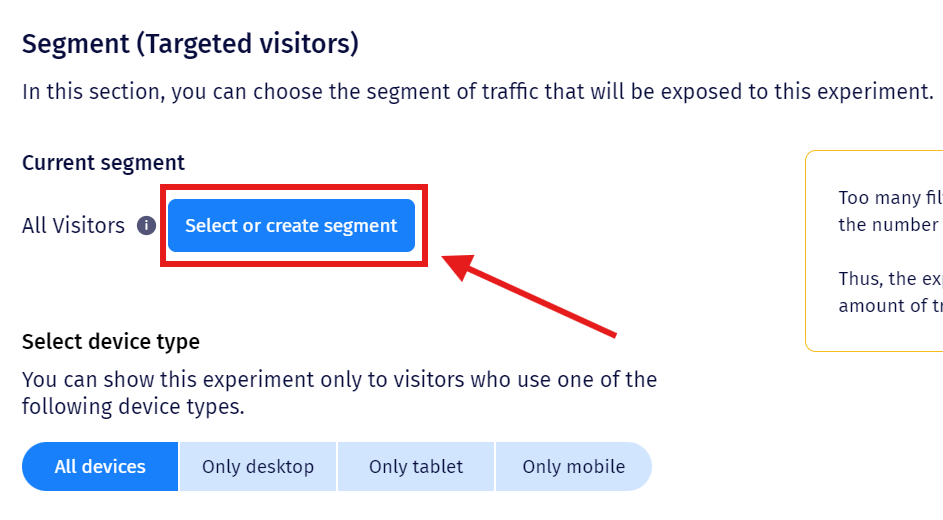
After you’ve done managing the pages where you want to run the overlay, select the Segment of visitors who will be included.
By default the experiment will be set to All visitors, just press on the Select or create segment to change it.
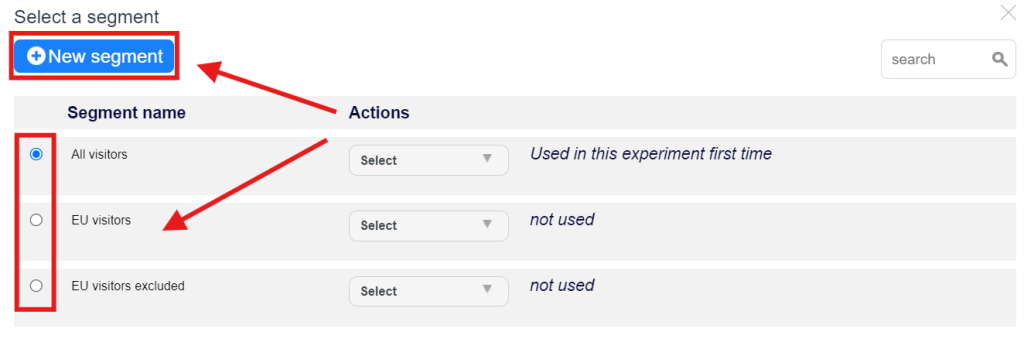
Here you are able to either select one of the existing segments or create a new custom.
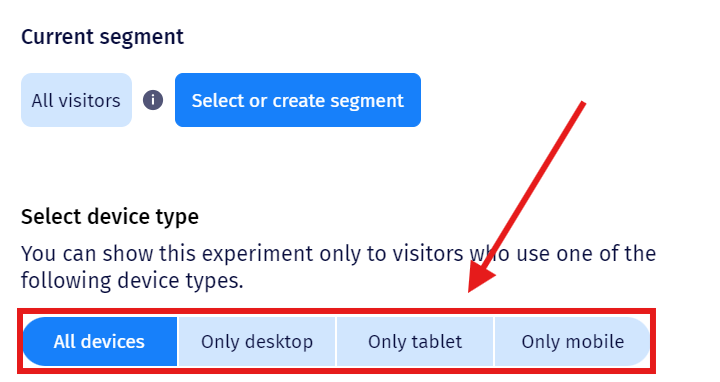
You can also customize the segmentation by the Device type, meaning only visitors using the specified device will be able to see the overlay.
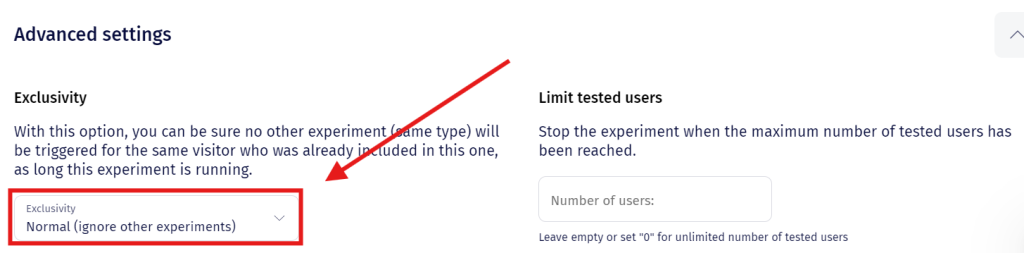
Advance Settings allows you to stop set limits for the experiment, meaning it will stop once a specified threshold is reached.
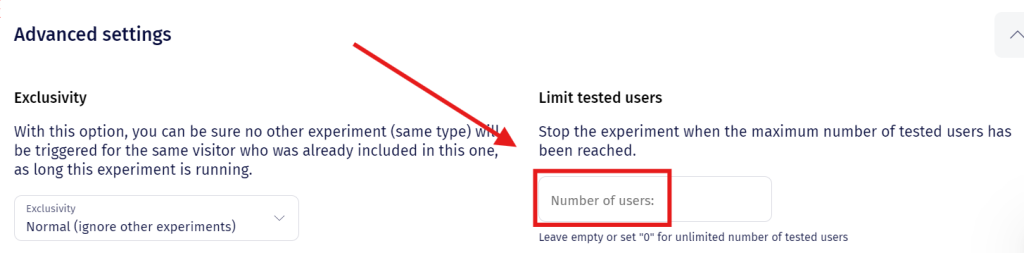
It also allows you to set exclusivity for your experiments, meaning you can either run multiple experiments at once or have only one of them prioritized.
Step 5. Traffic Allocations and Goals
In the next tab Traffic Allocations and Goals you will select the percentage of visitors that will see the overlay. This percentage will be randomly extracted from the segment you have decided to use. You can run the test on all of the visitors who are included in the segment or just a part of them (let’s say 50%).
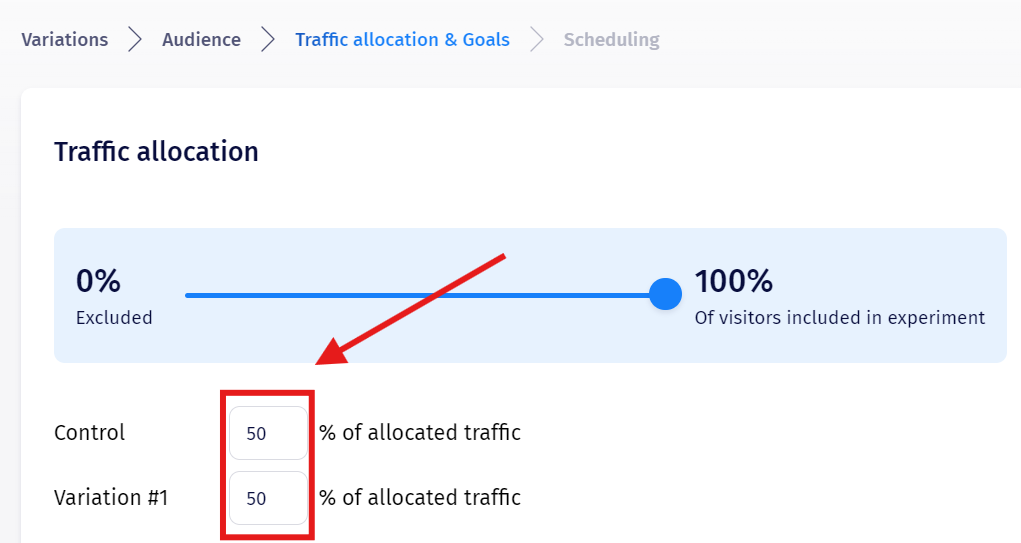
After the percentage of visitors is set you can use the variation traffic selector to modify how much of that percentage will see the Control ( original page ) and how much the Variation ( the page with the changes ).
Move the slider in order to determine the percentage of visitors from the total amount that will be included in the experiment.
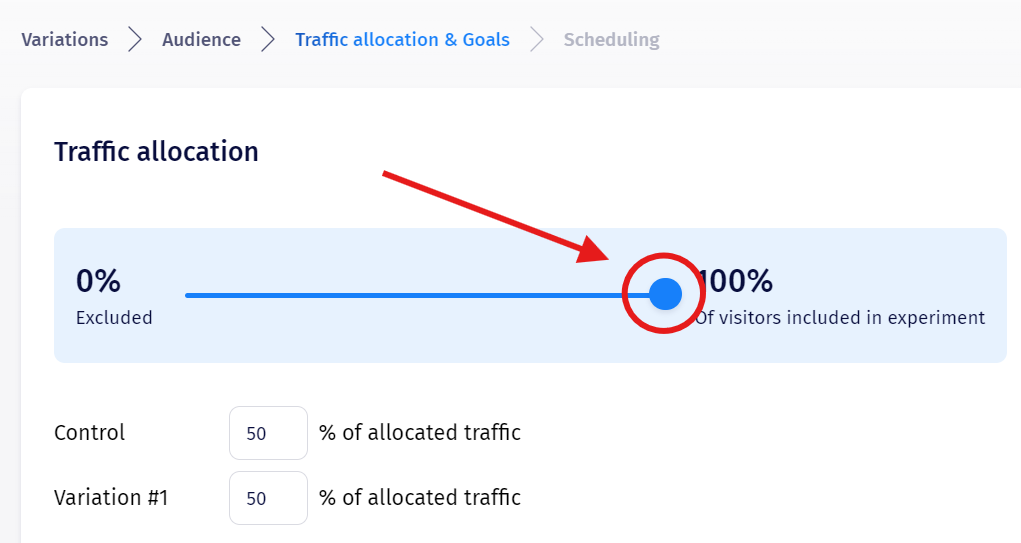
By changing the values of the allocated traffic you can decide how the users will be split between Control and Variation.
In the second part of the page, you will find the Goals. A goal is set to track sales, conversion rate, click rate, engagement, etc.
You can set them as page views or customizable goals such as conversion rate, sales – that require inserting a short code into the website’s source. The customizable goals allow you to see the impact of the overlay on the performance indicators: conversion rate, revenue, etc.
There are 3 predefined goals that you can use – Sale ( which works only after the Goal tracking code is inserted on the thank you page of your website – Click here for more details), Engagement and Bounce rate.
You can either select an already existing goal or create a custom one. Please remember that some goals might require integration on your website.
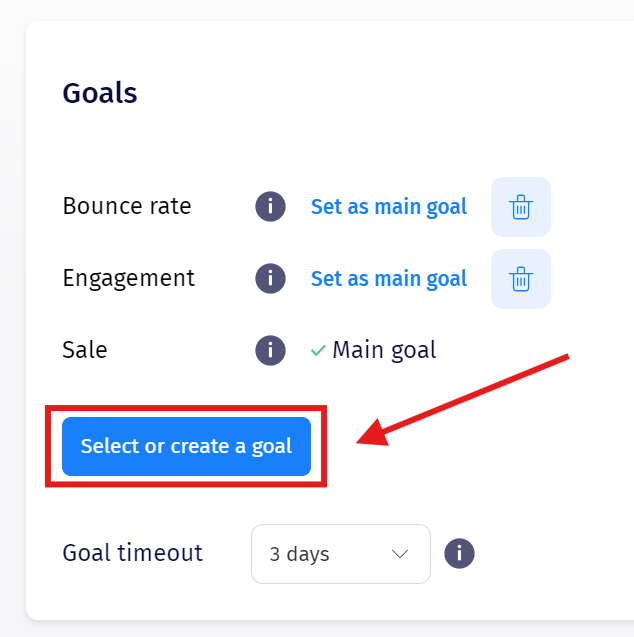
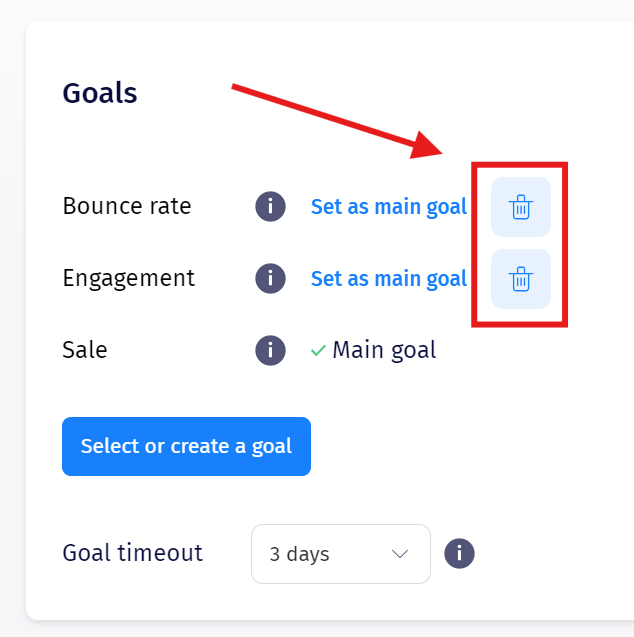
You can also remove specific goals from your experiment. These goals are measured by default but by pressing the Delete button you can remove them.
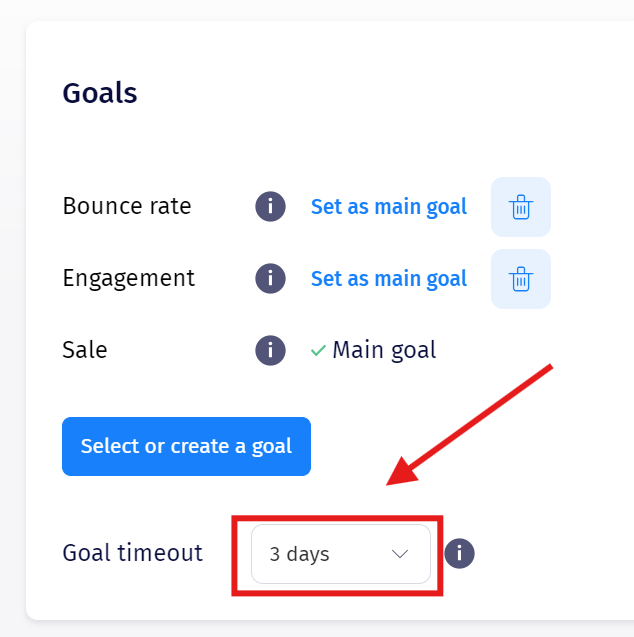
You are also able to select a goal timeout. This is a time interval after which all conversion goals achieved are not recorded anymore for this particular experiment.
Step 6. Scheduling and publishing
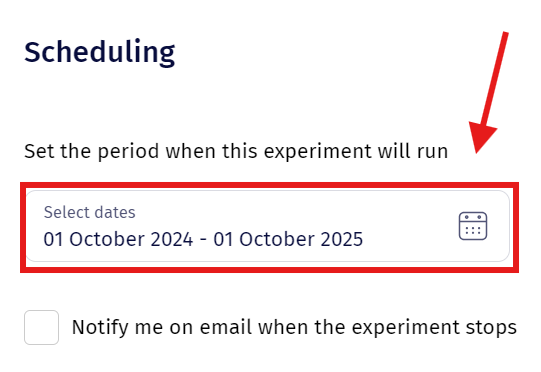
The last step of setting up an Overlay is to Schedule it. The first option for this is related to the frequency, which dictates how often the overlay can be shown to the visitors.

Under Frequency, you can see Scheduling, where you can select the timeframe when the experiment will take place.
You can then check this box if you want to be notified of when the experiments ends, using either one or multiple email addresses.

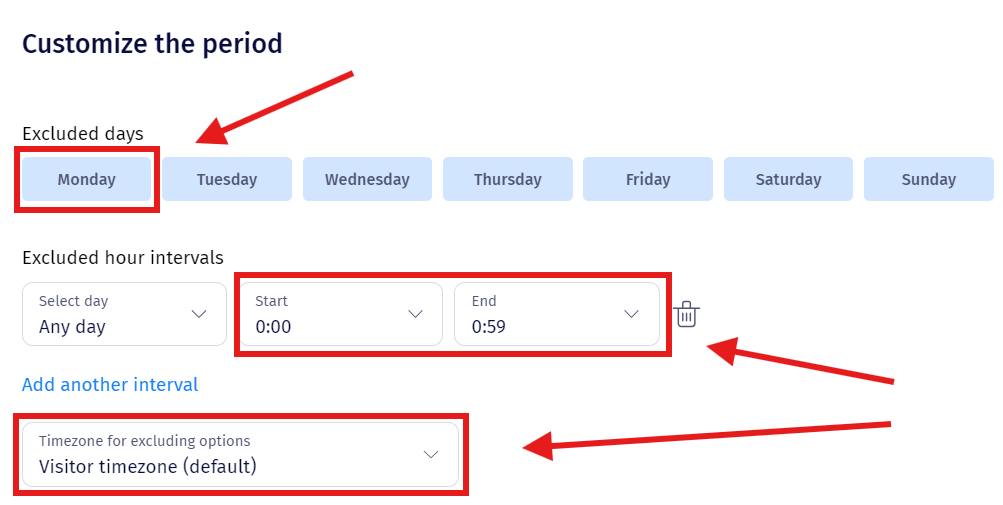
You can also set up excluded timeframes, either by selecting specific days or specific hours throughout the day. By default the Excluded hours intervals are not displayed but it will appear once you press the Add another interval button. The timezone options represents the timezone which should apply to the hour intervals you have selected previously.
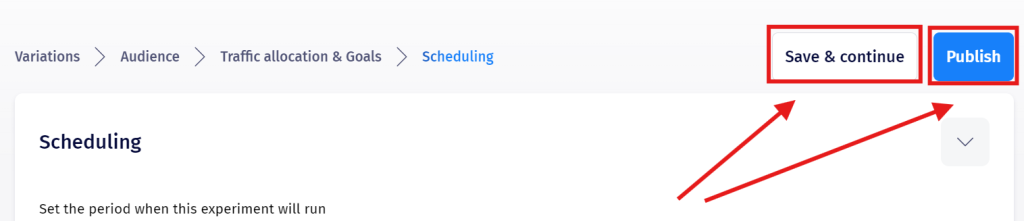
Last, but not least, Save & Continue or Publish the experiment.
That’s it! You’re ready to see which idea converts more!
DON’T FORGET : After each modification made you have to wait 3-4 minutes until it will be visible on the website.