The Sale Goal shows how:
- How many of your visitors who saw the experiment have bought something by reaching the thank you page of your selling funnel.
- The average order value amount.
- The revenue per visitor calculated taking into consideration the number of views the control or the variation has.
The revenue – it is the total amount of transactions made by visitors who saw the control or the variation.
The following section includes details for how to integrate the Sale goal on non-Shopify stores. If your website is on Shopify, you will need a Custom Pixel in order to track sales, documentation for that can be found here.
Implementing the Sale Goal
1. To start, go to Tracking code settings.
2. Once there, scroll down until you reach the How to install section, Step 3. You will find a code which you can copy, that’s your sale goal snippet.
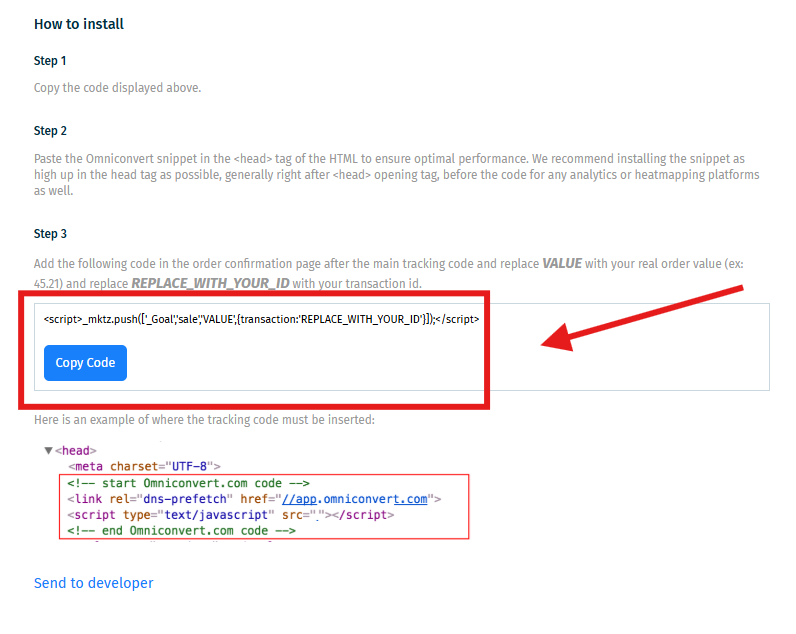
3. Go to your website’s Thank You page and past it somewhere between the <body> and </body> tags(your tank you page code will be here) using <script> tag before the snippet and </script> after it.
Just like this:
<!– start Omniconvert conversion goal code –>
<script>
window._mktz = window._mktz || [];
window._mktz.push([‘_Goal’, ‘sale’, ‘VALUE‘, { transaction: ‘TRANSACTION_ID‘ }]);
</script>
<!– end Omniconvert conversion goal code –>
You must replace VALUE with the JavaScript variable that returns the total revenue of your cart and TRANSACTION_ID with the JavaScript variable that returns the transaction id.
2.4. If you wish to track the ordered products too you need to add the SKUs key to the code above.
It should look like this:
<!– start Omniconvert conversion goal code –>
<script> window._mktz = window._mktz || [];
window._mktz.push([‘_Goal’, ‘sale’, ‘VALUE‘, { transaction: ‘TRANSACTION_ID‘, skus: [‘SKU1‘, ‘SKU2‘] }]); </script>
<!– end Omniconvert conversion goal code –>
You must replace SKU1 and SKU2 with the SKU of the ordered product. You can specify one single item or more than 2 items, as needed.
2.5. If you have multiple currencies on your website, you can use our multi-currency feature to convert all transactions in the same currency.
It should look like this:
<!– start Omniconvert conversion goal code –>
<script> window._mktz = window._mktz || [];
window._mktz.push([‘_Goal’, ‘sale’, ‘VALUE‘, { transaction: ‘TRANSACTION_ID‘, ‘currency’: ‘EUR‘ }]); </script>
<!– end Omniconvert conversion goal code –>
You must replace EUR with the name of the base currency you want all of the transactions to be converted into.
Be sure that you’ve installed the Omniconvert main tracking code into the header of your thank you page right after the <head> tag. Otherwise, the Sale Goal will not send data to the statistics of your experiments.
2.5. Now that the Sale goal is in place on your Thank you page and the main tracking code is between the <head></head> tags, you can place a test order that will later be deleted.
2.6. After you’ve placed the order and you’ve reached the Thank you page, right-click somewhere on the page, select View page source, scroll to where the Sale Goal has been implemented, and check it out. If the implementation has been made correctly, it must show the amount of the product you’ve bought.
3. Good to know
A Custom Goal can be used for lead collecting websites to see the value of the visitors that converted into a lead. To do that, insert the goal code into the Thank you page of the lead collecting form, and change Value with the how much does a lead worth to you, 5,10, 100 dollars/euros, etc.