By following the recommended steps described in this article, you will make use of the DataLayer integration available in your Explore account, which will allow you to send experiment related events into your GA4 property whenever users browse pages affected by your experiments.
Our guide implies that you already possess a bit of knowledge about web analytics tracking and that you’ve already created and installed a Google Tag Manager (GTM) web container on your website that sends data to your Google Analytics GA4 property.
We’ll try our best to make it as easy to understand as we can, but if you really find yourself struggling, feel free to send us a message and maybe we can stir up your curiosity on how much you’re missing out on our talented managed services team.
If you perform the following implementations while also having the Google Analytics Integration active in your Integrations section in Explore, you will be effectively doubling your GA4 events, once through the Explore Integration and once through the dataLayer and GTM integrations, thus affecting data quality and your analysis efforts.
Step 1. Activate the dataLayer integration in your Explore account
Select your website from your Explore account and then click on the Integrations button from the drop down menu.

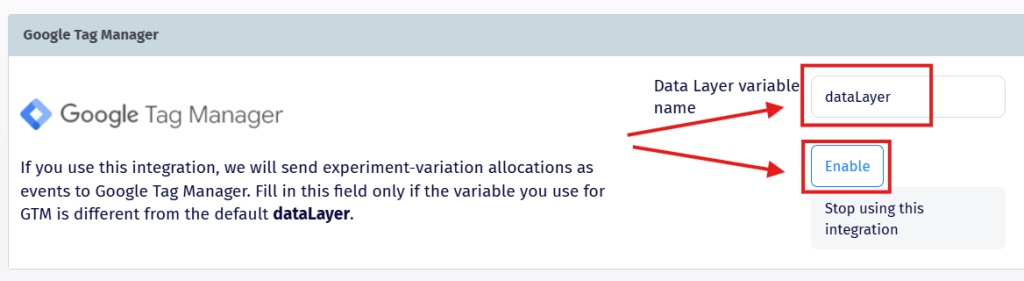
Scroll down to the Google Tag Manager section and input exactly “dataLayer” into the Data Layer variable name field.
To activate the integration, click on the Enable button.
Once the integration is enabled, you will start receiving Omniconvert events in the website’s dataLayer whenever the user sees a variation of an Explore experiment.
Every Omniconvert event contains two parameters which define the experiment name and the name of the variation:
As you can notice in the above screenshot, the Event Name is Omniconvert. Every such event also has the mktzExperiment and mktzVariation variables. These variables are populated in the following way:
- mktzExperiment: [ExperimentID]Experiment Name
- mktzVariation: [VariationID]Variation Name
In order to send the above information to your GA4 property, we’ll leverage Google Tag Manager’s ability to create and customize GA4 events.
Step 2. Creating the tag
From the Google Tag Manager workspace specific to your website, navigate to the Tags section.

Click on New to create a new tag.

Click on Tag Configuration to open the tag types menu.

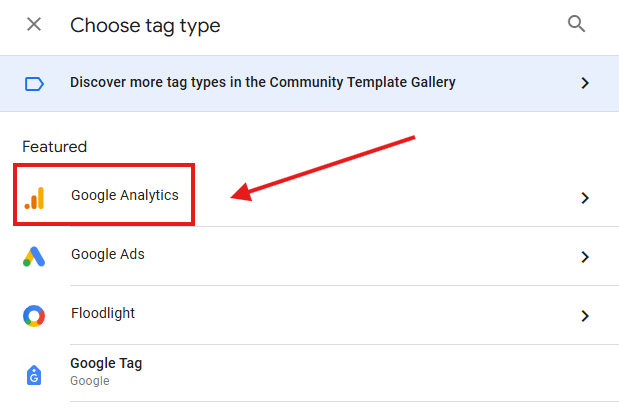
Select Google Analytics from the Featured section.
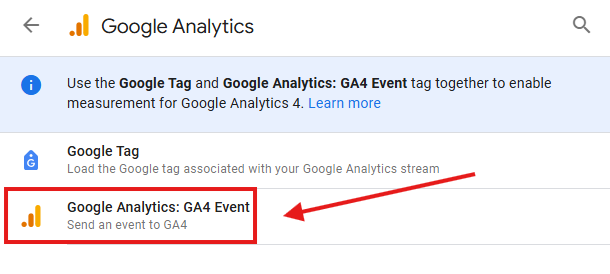
Select Google Analytics: GA4 Event as the tag type.
Define the tag as “GA4 – omniconvert”.

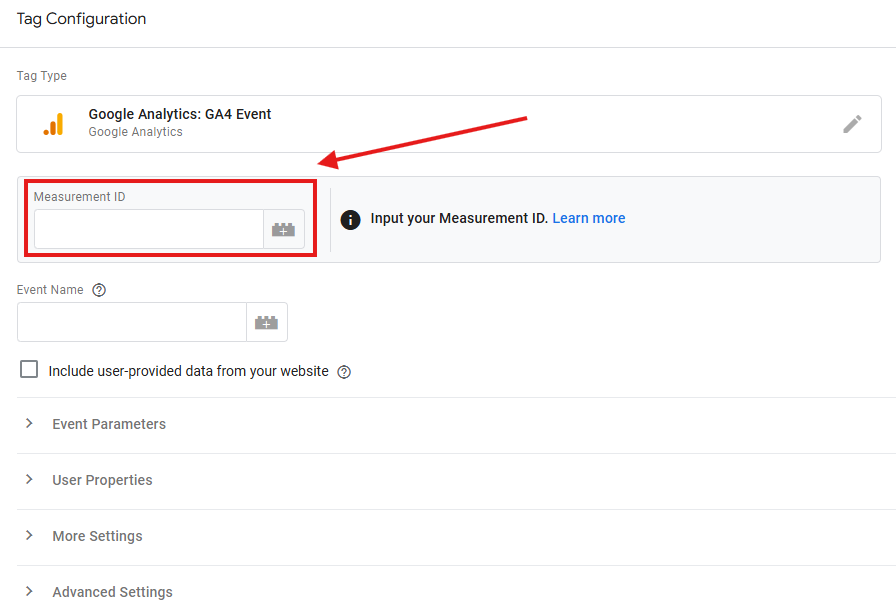
If you’re already using GTM to track GA4 events, you can pick up the GA4 Measurement ID from another GA4 tag. Make sure to copy the whole string in your newly defined “GA4 – omniconvert” tag.
Step 2.1. Obtaining the Measurement ID from your GA4 property.
If you don’t have any other GA4 tags in your GTM container, you can obtain the GA4 Measurement ID by following the steps below:
1. Navigate to your Google Analytics account.
2. Open the Admin menu by clicking the bottom right cog symbol.

3. Click on the Data streams menu from the Data collection and modification category.

4. Identify and click on your web data stream

5. Copy the GA4 Measurement ID and paste it into your “GA4 – omniconvert” tag, in the Measurement ID input field.


Let’s now continue the “GA4 – omniconvert” tag setup.
The next step would be to input the Event Name as “omniconvert”. This will be the unique event that will be displayed in your GA4 property after you publish the tag.

Step 3. Defining the experiment variables
Expand the Event Parameters section to uncover the “Add parameter” option, then proceed to add two empty parameters, which you’ll define in a moment.

Now you’ll have to define the two parameters which will pass on the Omniconvert event data from your website’s dataLayer to your GA4 property:
- The first event parameter will be defined as “exp_name” which will hold the value of the mktzExperiment dataLayer variable.
- The second event parameter will be defined as “exp_var” which will hold the value of the mktzVariation dataLayer variable.
To create the dataLayer variables that will hold those values, you can just type ‘{{‘ in the Event Parameter Value box, which should open up a drop down menu from where you can select New Variable after you scroll down at the end of the list.
Alternatively, you can click on the right-most Event Parameter Value button and click on the “+” symbol in the variable list window to add a custom variable.


Now, let’s define our new variable by choosing the Data Layer Variable type.


You can set a descriptive name in the top left corner, such as “dl – experiment name”.
Then, input exactly “mktzExperiment” as the Data Layer Variable Name and click Save.

After saving the variable, you should be redirected to the GA4 event tag.
Repeat the process for the second variable that we define as “exp_var” which you can name as “dl – experiment variation” and input exactly “mktzVariation” as the Data Layer Variable Name.

At this stage, your tag should look like below:

Step 4. Creating a trigger
Next up, we need to set up a trigger for the event, which will define the moment that the “omniconvert” event and the additional event parameters will be sent to your GA4 property.
To do so, you can click on the Triggering section below the tag, then on the “+” symbol near the right top corner of the window, followed by a click on the Trigger Configuration section.


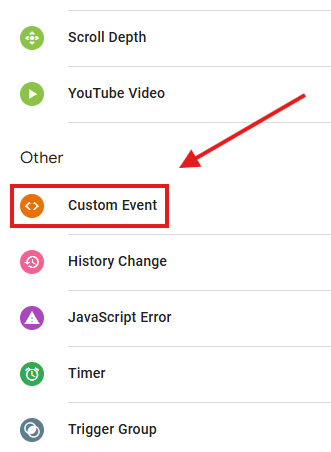
Now, select Custom Event as the trigger type.
Define the trigger as “event – omniconvert” and input exactly “Omniconvert” into the Event Name field. Then, proceed to Save the trigger.

Step 4.1. Defining the custom dimensions in your GA4 property
In order for those two event parameters (“exp_name” & “exp_var”) to be recognized and processed in your GA4 property, they have to be firstly defined in your GA4 admin section.
To do so, follow the steps below:
1. Navigate to your Google Analytics account.
2. Click on the bottom right cog symbol to navigate to your Admin section.
3. From the Data Display category, click on Custom Definitions:

4. Click on Create custom dimension:

5. Input exactly “exp_name” in both the Dimension name and the Event parameter fields. Also, make sure the Scope is set as “Event”, then click Save:

6. Repeat the process for the second custom dimension that you’ll define exactly as “exp_var”, then click Save:

The end result should look like below:

Now that we’ve defined the custom dimensions, the last and final step would be to verify and to publish the GTM container changes.


You can also add a short Version Name and Version Description for easier versioning identification, then click on Publish.

Important
Data will only be collected when your website’s users actually interact with a page affected by an active Explore experiment, thus triggering the “GA4 – omniconvert” tag via the active GTM integration in Explore.
Allow up to 24 hours for event data to be populated in your GA4 property from the moment you publish the tag and/or from the first triggered event.
Step 5. Visualizing the data
To visualize the newly collected “omniconvert” events and event parameters, we suggest leveraging Google Analytics’s ability to create Exploration reports, which allow you to configure custom reports to help you visualize your data.
As a more complex alternative, you can use Looker Studio or any other reporting tool that allows GA4 data import to bypass the visualization restrictions imposed by Google Analytics. If you’re curious about this, but don’t possess the technical knowledge or you’d rather spend your precious time on other important topics, don’t hesitate to contact our managed services team to unlock your full analytics potential.
Exploration report steps
1. Navigate to the Explore section of your GA4 property:

2. Create a Blank exploration report:

3. Give it an easy to remember name, such as “Omniconvert events”:

4. Click on the “+” symbol next to DIMENSIONS:

5. Search for “event” and select Event name:

6. Search again for “exp” and select both the “exp_name” and “exp_var” custom dimensions, then Confirm your selection:

7. Next, proceed to add some metrics to associate with your selected dimensions by clicking on the “+” symbol near the METRICS:

Search for “Sessions”, “Total users” and “Event count” sequentially and make sure you click on the checkbox for each respective search resulted metric, then Confirm your selection:

9. Double click each DIMENSION and METRIC individually to add them into the Free form 1 report (this will automatically assign each selected dimension to the report ROWS section and each metric to the VALUES section:

Scroll down in the Settings pane until you reach the FILTERS section, then select the Event name dimension, select exactly matches as a Condition and input exactly “omniconvert” in the filter field, followed by Apply:

Select different date intervals that should have collected “omniconvert” events already processed and see how many users, sessions or “omniconvert” events have been collected in that timeframe.
Congratulations!
You’ve successfully enabled the Explore GTM integration, created your (possibly) first GTM tag, defined custom dimensions for your GA4 event and designed a standard Explorations report in your GA4 property.
You’re well on your way to become a self taught web analyst!
If you’d like to discover even more ways to enhance your data collection and analysis efforts, feel free to reach out and we’ll be more than happy to help you out!
Until then, best of luck and happy tracking!