Server-side A/B testing is a form of experimentation where the variations of a test are rendered directly on the web server, before it is delivered to the client.
This is distinguished from client-side testing, where the A/B test is rendered on the client-side through JavaScript after the page is delivered to the user’s browser.
As you will see the Visual Editor and options like Preview will not be available on the server-side testing experiments.
Why use server-side experimentation?
What are the main advantages? It can be used for deeper tests like pricing logic, checkout flow, algorithm changes, or anything involving backend processes.
It also lowers the chances for flicker or visual loading issues considerably.
These advantages are why we developed this new feature, available for you to use.
We have also developed a developer kit (SDK) for the PHP programming language, with more SDKs for other languages on their way in the upcoming quarters. These SDKs provide A/B testing functionality and the communication with the Explore platform that can be used easily in applications.
Further down, we will go over the steps of setting up an server-side experiment, as well as showcase the installation of the SDK, alongside a few examples of how to use it.
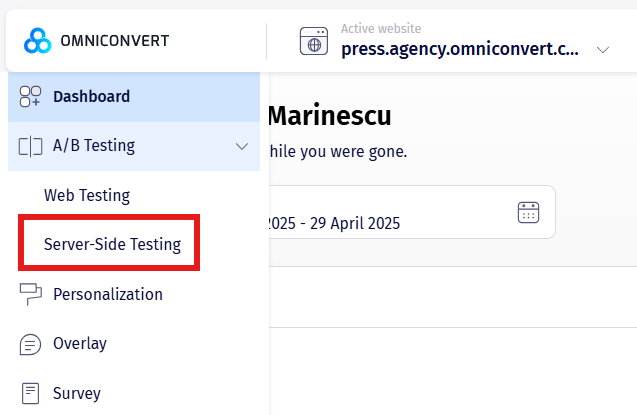
Step 1. Create a new A/B test experiment
From the top left menu, press on A/B Testing to open the dropdown, and select Server-Side Testing.
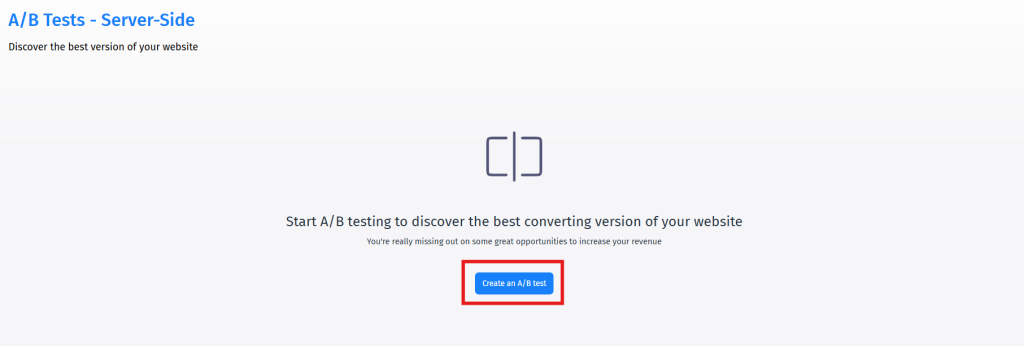
From the new screen, press on Create an A/B test.
In the next window, you will add the information for the experiment, starting with the Title.
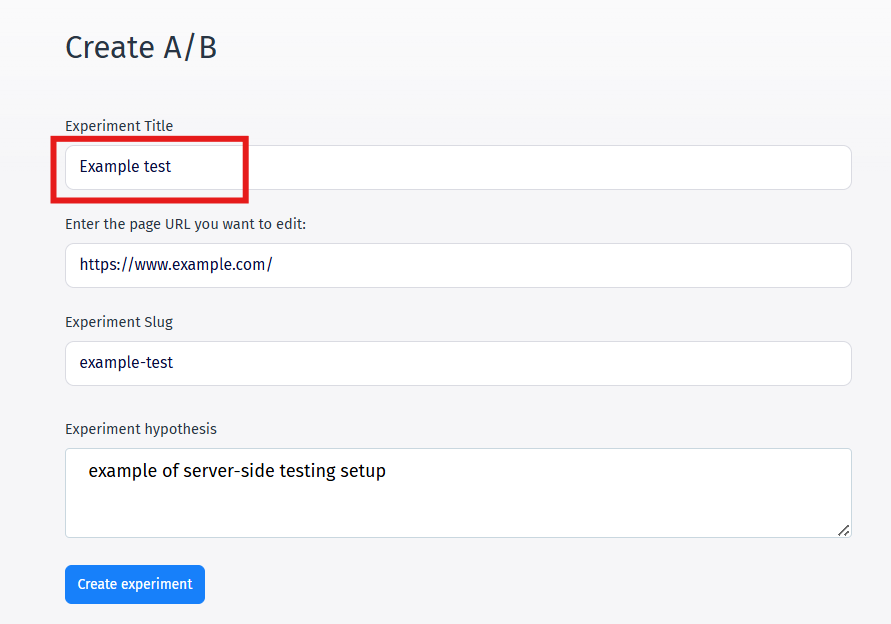
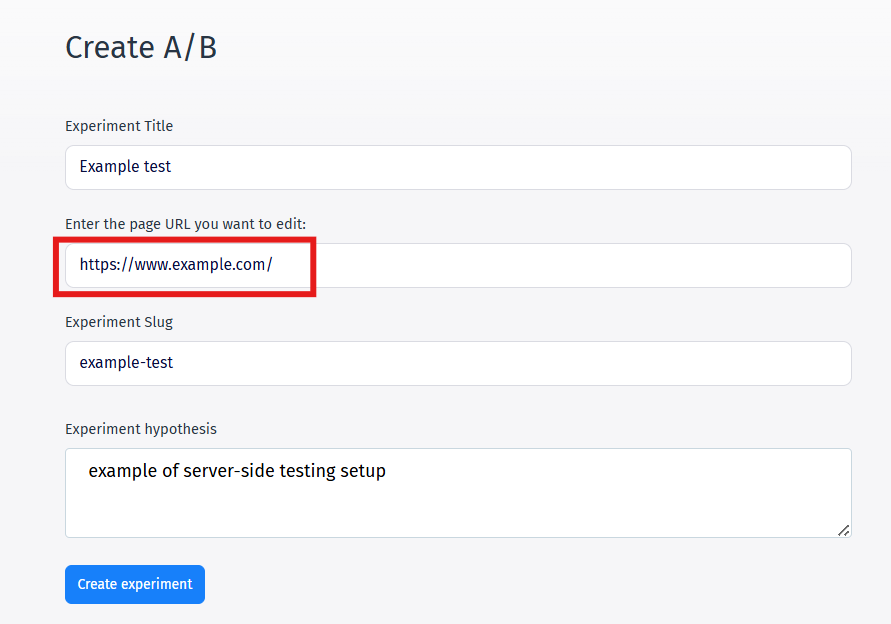
Followed by the URL of the page you want to make the changes to.
Next up, the Experiment Slug, this makes it easier for you to find the experiment, especially in code.
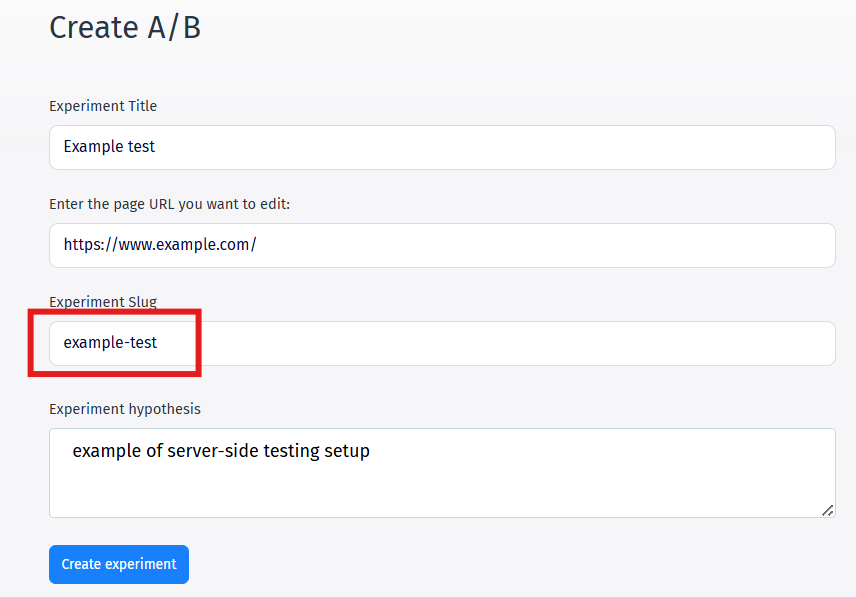
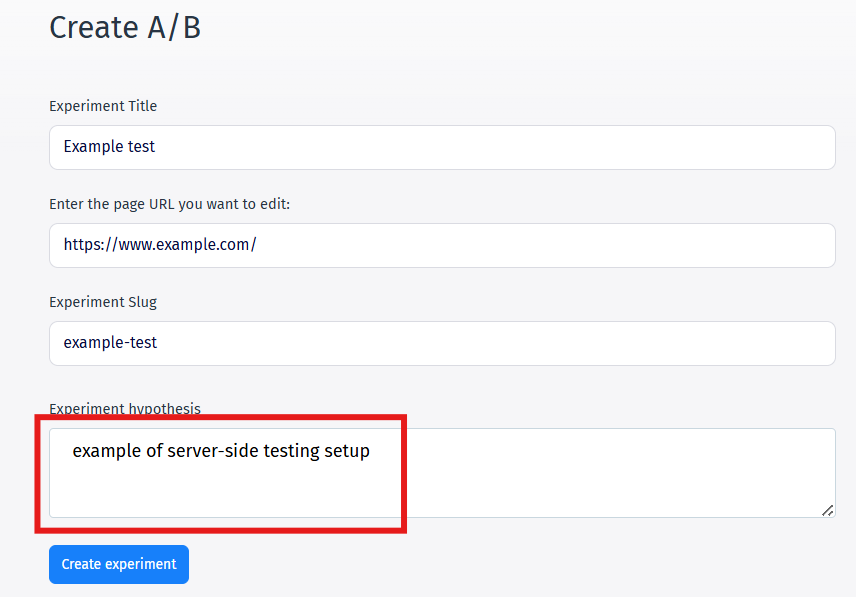
And lastly, you can write your hypothesis for the experiment.
Step 2. Apply the changes in the variation editor
Step 2.1. Input your Variables
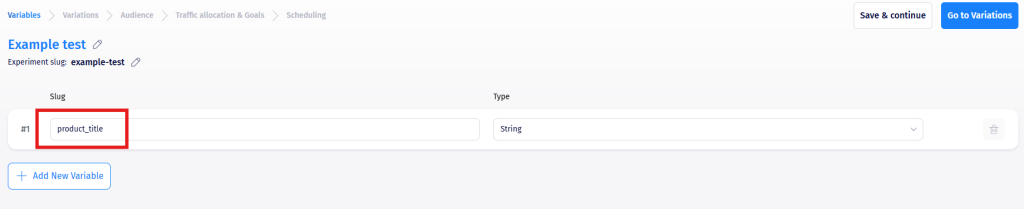
The first section during the setup of a server-side experiment will be the Variables tab.
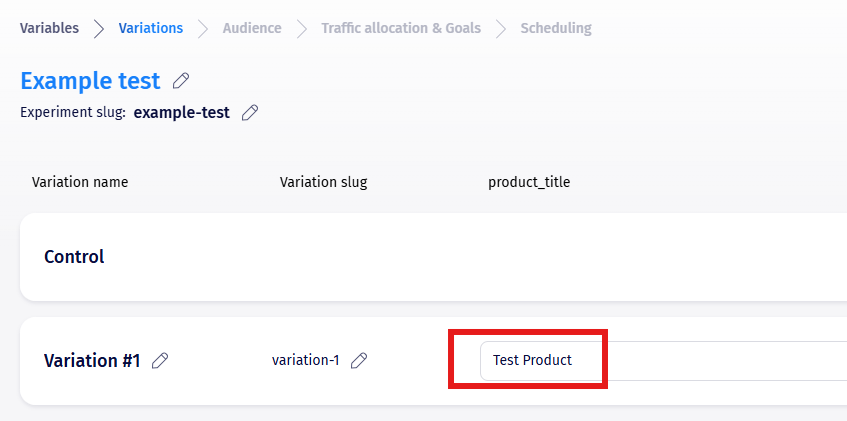
Variables represent information which can be transmitted to your application.
One example for this would be product_title.
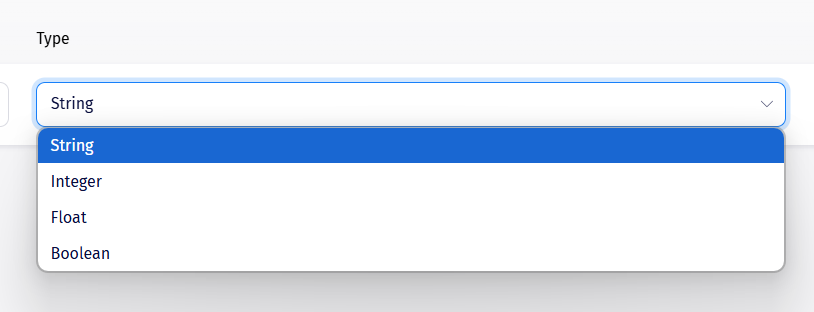
You can also select from multiple options when it comes to the Type of Variable you will transmit.
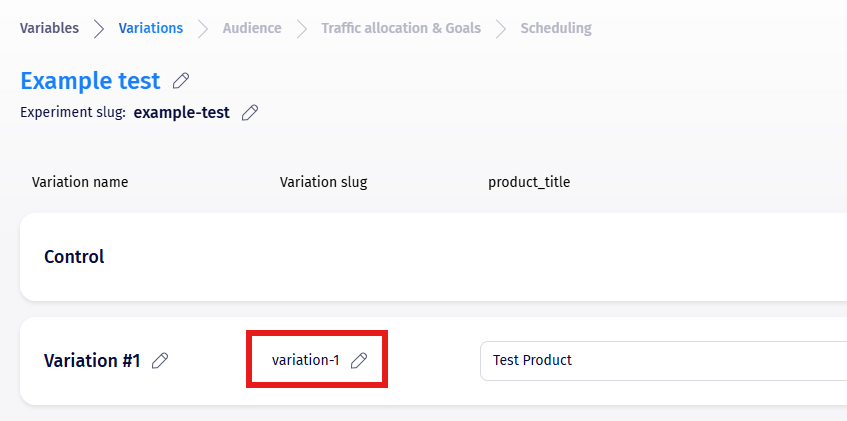
Step 2.2. Setting up the Variations
Like in a regular A/B Test, you can have multiple variations, as per your needs.
First, we need to specify a value for the variable we added.
It is also best practice to define a slug for this variation. You can do this by pressing on the pencil icon.
Step 3. Set the audience and segmentation
Step 3.1. Manage pages where you want to run this experiment
Now you have to choose your Audience. That means that you must Manage pages where you want to run this experiment and select the Segment (Target) of visitors you want to see the experiment.
To select the pages where you want to run the experiment you can choose from different conditions for the URL :
1. URL is: With this rule, the A/B test will run only on the exact page introduced in the value field next to the condition
2. URL is not: With this rule, the A/B test will run on all the other pages but the one introduced in
the value field next to the condition
3. URL starts with: With this condition, the A/B test will run on all the pages that have an URL
which starts with the same value as inserted in the value field
4. URL ends with: With this rule, the A/B test will run on all the pages that have an URL which ends with the
same value as inserted in the value field next to the condition
5. URL contains: Using this condition the A/B test will run on all the pages that contain in their
URL the same value as the one inserted in the value field
6. URL does not contain: Using this condition the A/B test will run on all the pages that do not
contain in their URL the value entered in the value field
7. URL RegEx: Using this you can define with RegEx the pages where you want the A/B test to
run
8. Page contains keyword: With this, the A/B test will run only on the pages that contain the
keyword or keywords in a small sentence/grouped format
This is an example of a product description:
This is an awesome product with awesome features at half of the price of other providers.
Correct keyword to use: awesome product Not correct keyword to use: awesome providers
If you don’t have a large amount of traffic on your website, we recommend you add multiple pages in the test.
When you do this you must add only the pages that have the same structure as in case of an e-commerce website where all of the product pages look similar.

The same applies for Excluded URL pages, useful if you want the experiment to apply to multiple pages with few exceptions.
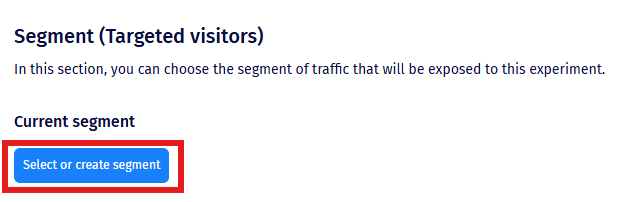
Step 3.2. Segment (Targeted visitors)
After you’ve done managing the pages where you want to run the experiment select the Segment of visitors who will be included.
By default, the first experiment will have no segment, just press on the Select or create segment to change it.
Here you are able to either select one of the existing segments or create a new custom.
One of the most useful segment you can have is All visitors, as this will include all your traffic.
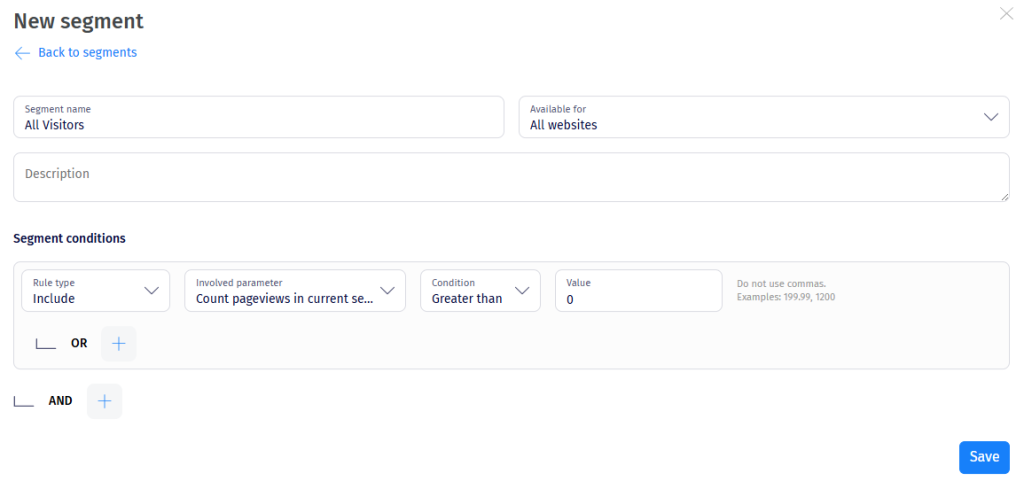
You can create this setup by using the Count pageviews in current session parameter, and having the condition being Greater than, with a value of 0.
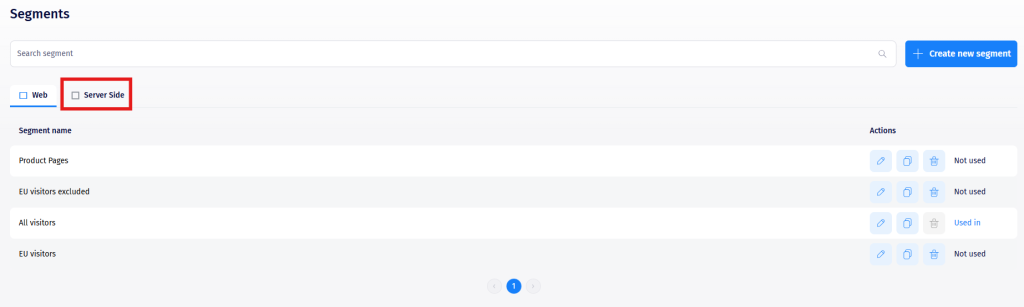
Please bear in mind that the segments you create for server-side tests will be separate from the segments you create for client-side tests.
To see them, you will have to switch from the Web section to the Server Side section in Advanced – Goals.
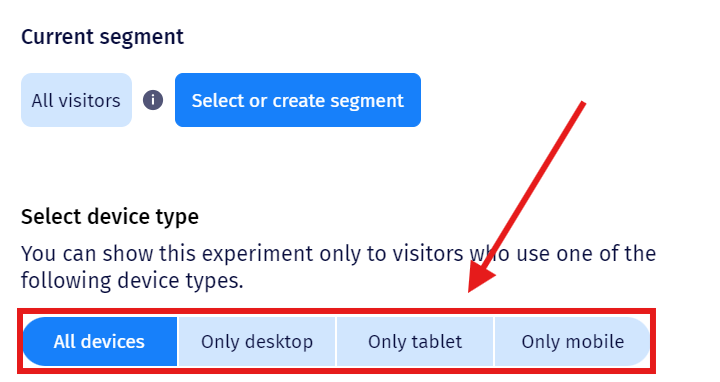
Step 3.3. Device Type
You can also customize the segmentation by the Device type, meaning only visitors using the specified device will be able to see the experiment.
Step 4. Set the traffic allocation and goals
Step 4.1 Traffic allocation
In the next tab Traffic Allocations and Goals you will select the percentage of visitors that will see the experiment. This percentage will be randomly extracted from the segment you have decided to use. You can run the test on all of the visitors who are included in the segment or just a part of them (let’s say 50%).
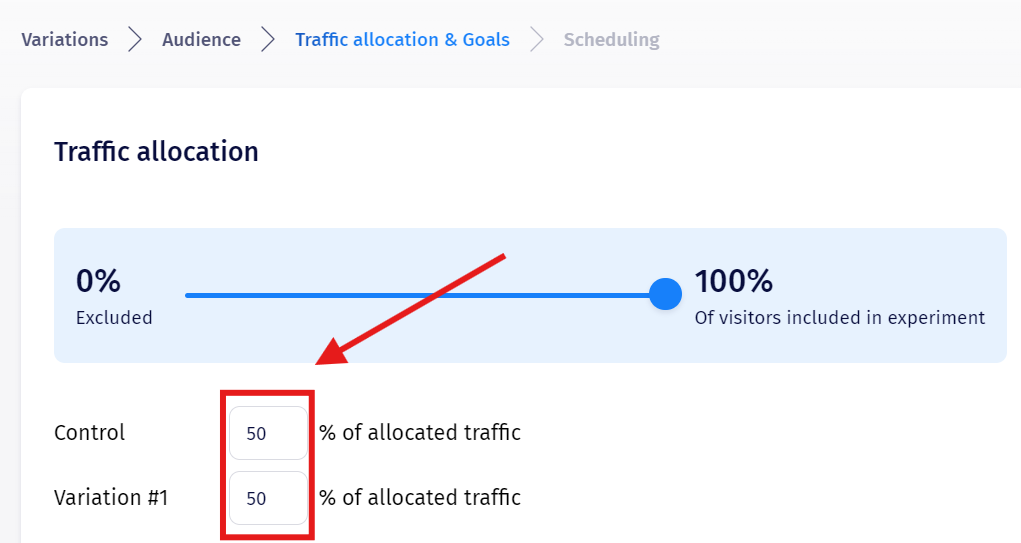
After the percentage of visitors is set you can use the variation traffic selector to modify how much of that percentage will see the Control ( original page ) and how much the Variation ( the page with the changes ).
Move the slider in order to determine the percentage of visitors from the total amount that will be included in the experiment.
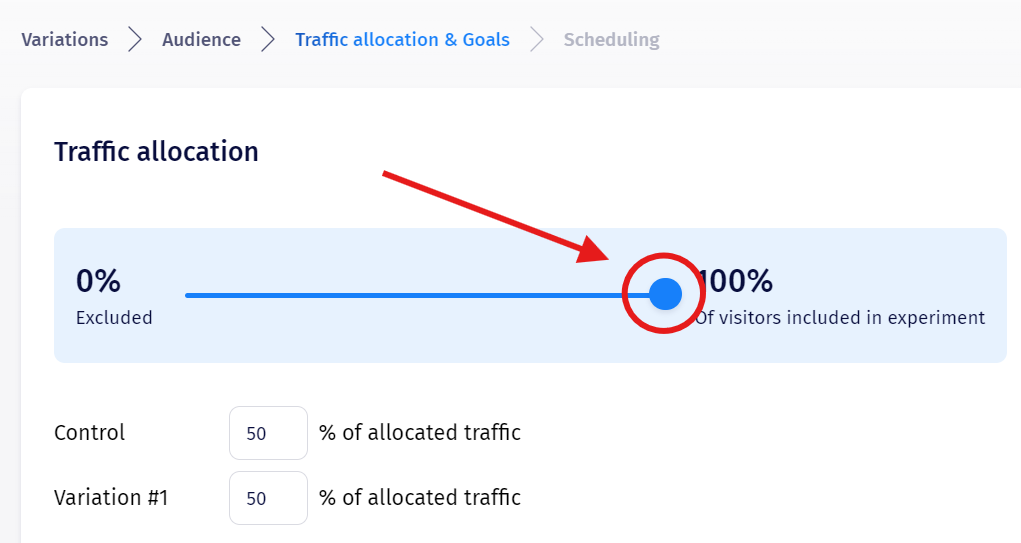
By changing the values of the allocated traffic you can decide how the users will be split between Control and Variation.
Step 4.2. Goals
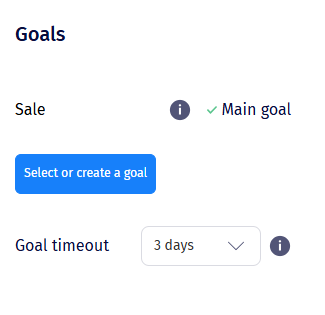
In the second part of the page, you will find the Goals. A goal is set to track sales, conversion rate, click rate, engagement, etc.
You can set them as page views or customizable goals such as conversion rate, sales – that require inserting a short code into the website’s source. The customizable goals allow you to see the impact of the change in the A/B test on the performance indicators: conversion rate, revenue, etc.
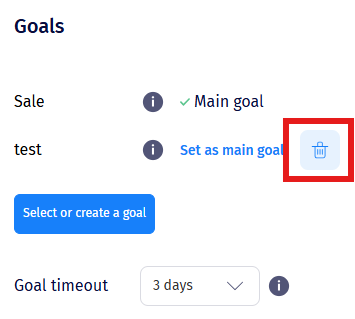
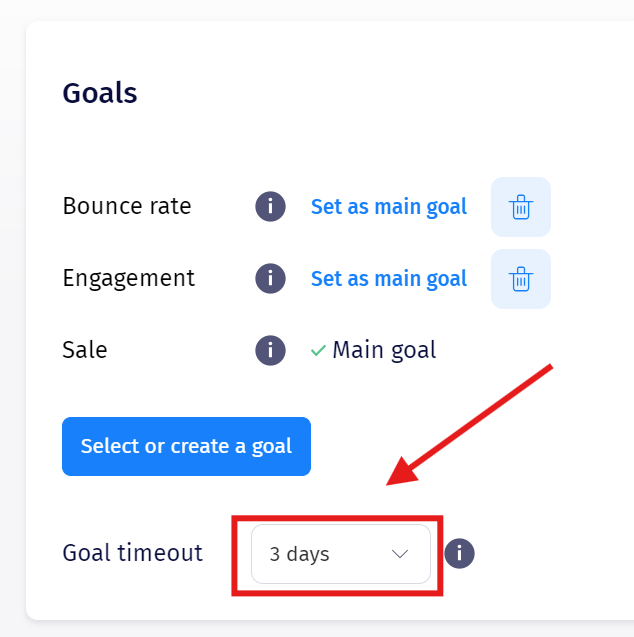
There are 3 predefined goals that you can use – Sale ( which works only after the Goal tracking code is inserted on the thank you page of your website – Click here for more details), Engagement and Bounce rate.
You can either select an already existing goal or create a custom one. Please remember that some goals might require integration on your website.
By default, the experiment will have the Sale goal selected.
You can also remove specific goals from your experiment. These goals are measured by default but by pressing the Delete button you can remove them.
You are also able to select a Goal timeout. This is a time interval after which all conversion goals achieved are not recorded anymore for this particular experiment.
Step 5. Schedule and publish the experiment
Step 5.1. Scheduling
The last step of setting up an A/B test experiment is to Schedule it. Here you can select the timeframe when the experiment will take place.
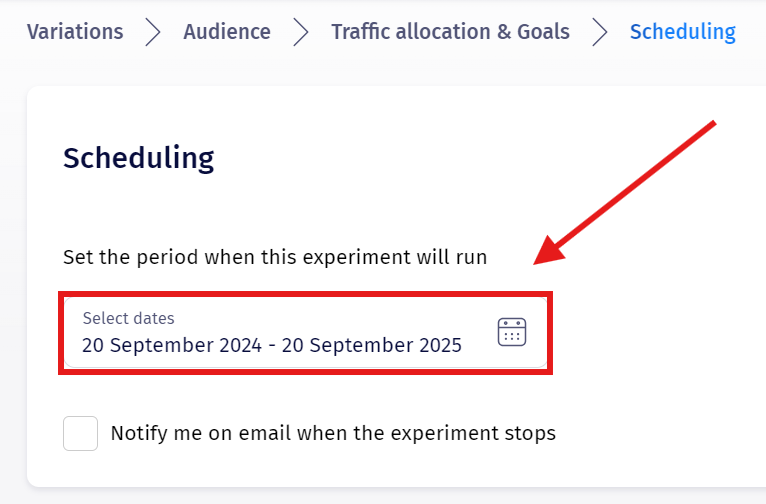
You can then check this box if you want to be notified of when the experiments ends, using either one or multiple email addresses.

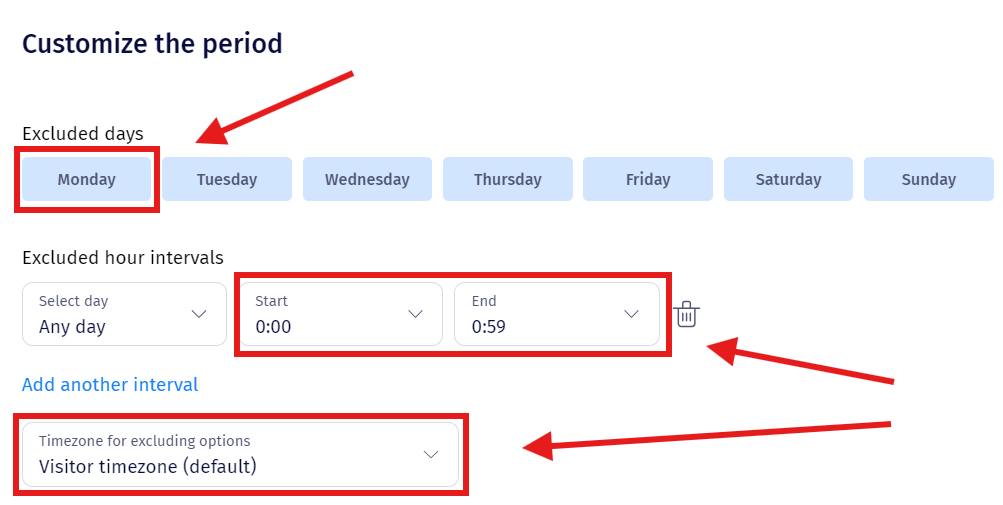
You can also set up excluded timeframes, either by selecting specific days or specific hours throughout the day. By default the Excluded hours intervals are not displayed but it will appear once you press the Add another interval button. The timezone options represents the timezone which should apply to the hour intervals you have selected previously.
Step 5.2. Publish the experiment
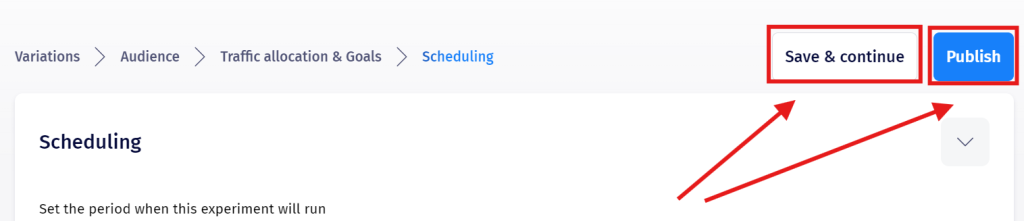
Next up, you can either chose Save & Continue to save the experiment settings or Publish to launch the experiment.
API Settings
After the experiment has been created, you will see a new section called API Settings, which will bring you to an example of how to use the SDK in your application.
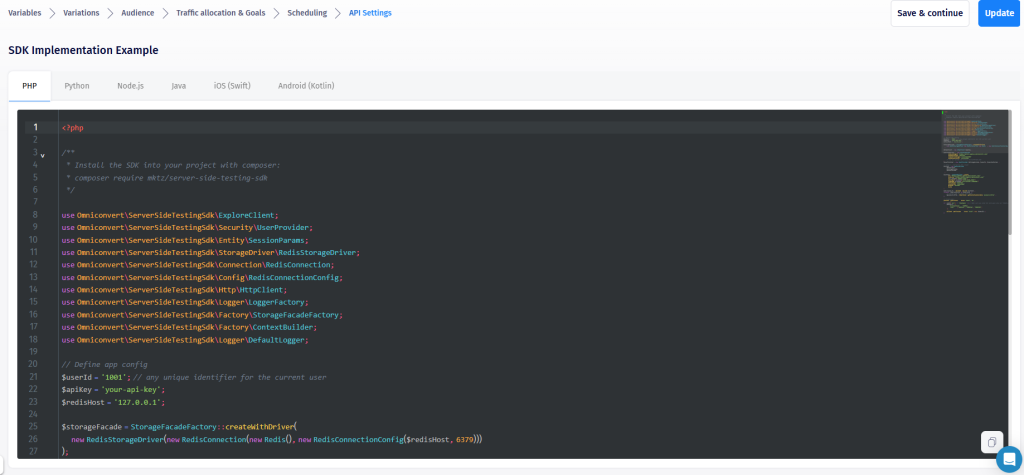
In this tutorial we wil present the example in PHP, but multiple SDKs are available, for the following languages: Typescript (Node), Java, Kotlin (for Android), Swift (for iOs/MacOs).
Step 6. SDK Installation
Step 6.1. SDK Installation
Now that our experiment has been created, it’s time to setup the project.
For the PHP SDK we have a public package which is available here, and it can be installed easily with composer.
The command to install it is:
composer require mktz/server-side-testing-sdkStep 6.2. API Key
After the package has been installed, we need to set it up. To do that, we will need an API Key.
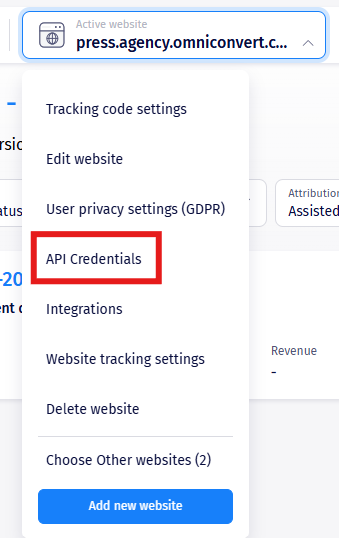
To obtain it, from the Explore platform, press on your website to open up the dropdown and select API Credentials.
If you don’t already have an API key, press on Generate API Key

You can edit the Label of the key, giving it a more relevant named.
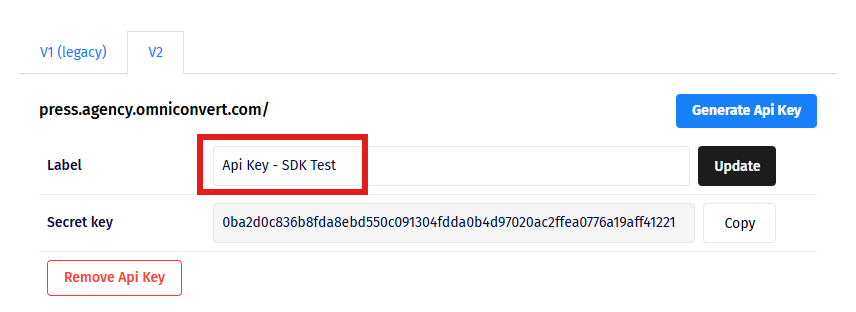
Next up, you can press the Copy button, allowing you to use it in your application.
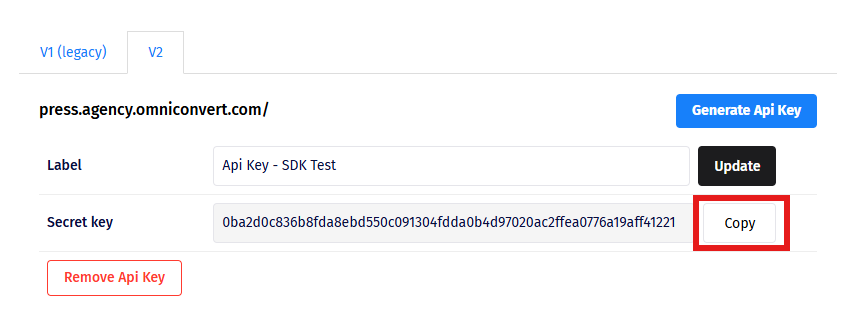
And finally, Paste the API Key in your application.
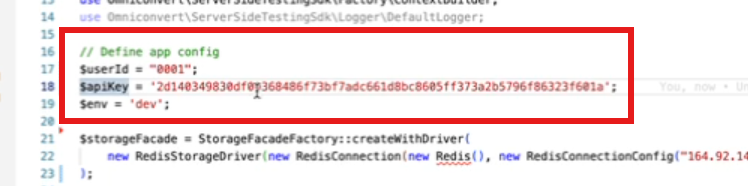
Step 7. Define app config
Here is an example of how your configuration could look like:
// Define app config
$userId = "900006";
$apiKey = 'xxxx';
$env = 'dev';
$storageFacade = StorageFacadeFactory::createWithDriver(
    new RedisStorageDriver(new RedisConnection(new Redis(), new RedisConnectionConfig("127.0.0.1", 6379)))
);
$httpClient = new HttpClient($apiKey, 'https://app.omniconvert.com/', $env === 'dev');
$sessionParams = (new SessionParams())
    ->setReferrerUrl('https://www.omniconvert.com/')
    ->setReferrerDomain('www.omniconvert.com')
    ->setReferrerType('referral')
    ->setLandingUrl('https://www.omniconvert.com/')
    ->setDeviceType('desktop')
    ->setGa4TrackingId('G-000000000')
;
$userProvider = new UserProvider($storageFacade, $userId, $sessionParams);
$clientConfig = new ClientConfig($storageFacade);
// Step 2 - Initialize the client
$client = new ExploreClient(
    $httpClient,
    $storageFacade,
    $userProvider,
    $clientConfig
);
$context = ContextBuilder::create()
    ->url('https://' . $_SERVER['HTTP_HOST'] . $_SERVER['REQUEST_URI'])
    ->referrerType("referral")
    ->referrer("https://www.omniconvert.com/")
    ->ip("127.0.0.1")
    ->custom("vip_user", "yes")
    ->utm([
        'source' => 'this_source',
        'medium' => 'this_medium',
        'campaign' => 'campaign_name',
        'content' => 'content',
        'term' => 'term',
    ])
    ->userAgent("Mozilla/5.0 (Macintosh; Intel Mac OS X 10_15_7) AppleWebKit/537.36 (KHTML, like Gecko) Chrome/120.0.0.0 Safari/537.36")
    ->language("en-US")
    ->deviceType("desktop")
    ->resolution("1728x1117")
    ->browser("Chrome")
    ->browserLanguage("en-US")
    ->browserVersion("120.0.0.0")
    ->os("macOS")
    ->language("en-US")
    ->referrer("https://www.omniconvert.com/customer-lifetime-value-ecommerce-benchmark/")
    ->referrerType("referral")
    ->build()
;
In the next steps we will go through each concept from the code above and explain them.
Step 7.1. User ID
Next up we need to specify a User ID. This has to be something unique for the user.
If you have a User ID from your database, if the user is logged in, please use that.
But you can also use PHP session ID or any similar unique information you have about this user.
Step 7.2. Storage
We also need a storage connection. This is supported in the SDK.
Information which is stored includes: experiments which were visited, user history, different caching for experiments configuration.
These are stored in Redis in order to make the SDK run faster, as we do not want to make requests to Explore all the time, therefore decreasing the speed.
Step 7.3. HTTP Client
Next, we will define a client that will know how to communicate with Explore.
All that is required here is an API Key, endpoint and a flag to let us know if we need a cache bypass or not.
There are two use cases:
Development
Here we provide an API Key, the endpoint, the one bellow is the default one and will never change, as well as a flag which enabled cache bypass.
Everything the SDK receives is cached for up to 5 minutes, so we can use the cache bypass functionality to skip it.
$httpClient = new HttpClient($apiKey, "https://app.omniconvert.com/", $env === 'dev');
Production
For production mode, we want things cached so it moves faster, therefore disable cache bypass, like this:
$httpClient = new HttpClient($apiKey);
Step 7.4. Session Parameters
The next step is to set up some parameters for the user session. These are not compulsory, but might be required according to your use case.
All of the the parameters can be found here.
Step 7.5. User Provider
After that, a User Provider needs to be build.
Step 7.6. Context
We then need to define a context, these are the parameters of the current user on the current page, like URL, referral types, IP, browser information, etc.
Step 8. Get a decision from the SDK
After we finalized the setup, we need to ask the SDK to make a decision: based on the previous parameters, which experiment do we show to the user.
The SDK needs to process all the context and compare it to the experiment information you have setup and provide a list of experiments to apply to the user.
$decisionList = $client->decide($context);
This function returns a list of experiments and variations that you need to apply in order to get the experimentation working. The SDK takes care of user bucketing, segmentation and audience selection. You just need to implement the experiment itself. This is how it might look like for one active experiment:
$decisionList[0]->getVariation()
Example response:
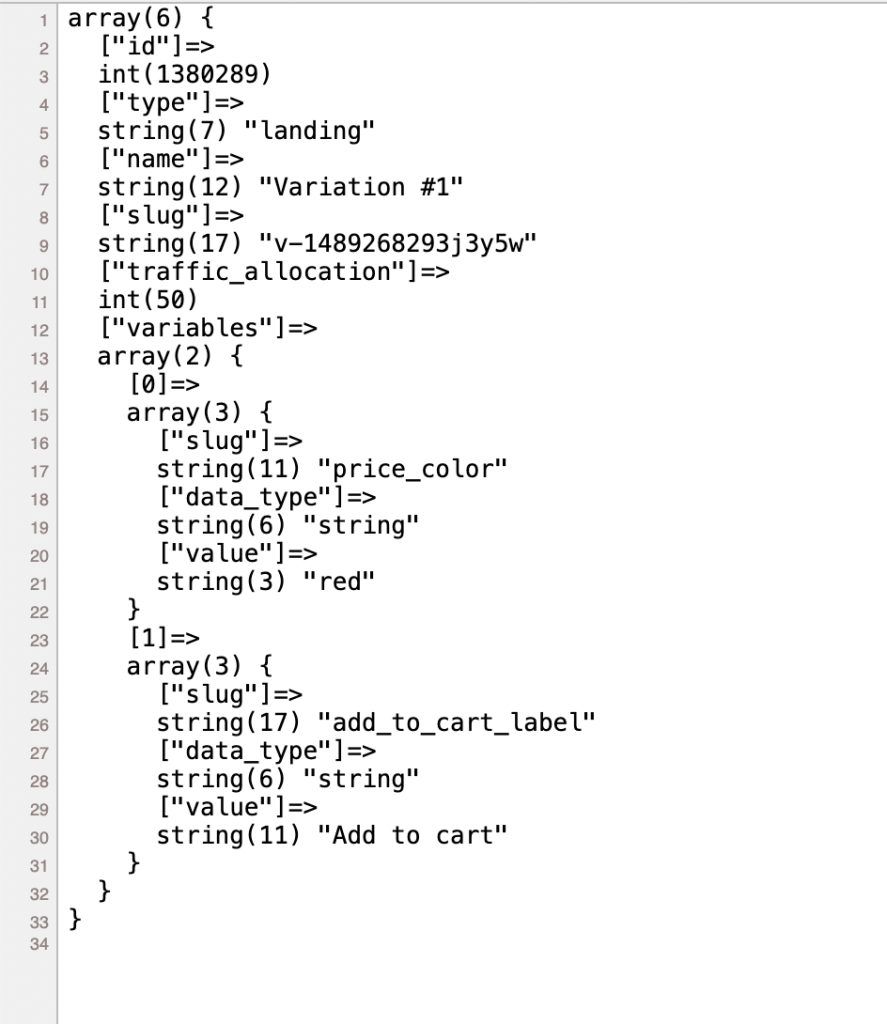
As shown, the SDK determines and returns the variation that should be presented to the user. Fields such as id or slug can be used as feature flags in your code, allowing you to conditionally apply changes for specific user segments. The response also includes the list of experiment-defined variables along with their resolved values, ready for direct use in your implementation.
Step 9. Track events and register goals.
The SDK provides helper functions for tracking various types of events, such as pageviews, sale goals, and custom goals.
// Trigger goal with product SKUs
$details = [
    "transaction" => "1555",
    'skus' => ['PROD123', 'PROD456', 'PROD789']
];
$tracker->track("sale", 111, $details); // Required
// Track custom goal
$tracker->track("custom_goal", "custom_value");
Explore can only start collecting data after the corresponding goals have been created.
Logging and debugging
Use the static getLogs function to retrieve the SDK logs. These logs help explain why an experiment was or was not selected for the current user, providing detailed insights into traffic allocation, experiment evaluation, audience targeting, and user bucketing decisions.
$logs = DefaultLogger::getLogs(DefaultLogger::LOG_LEVEL_KEY_ALL);
LoggerDumper::dump($logs);
API Reference and Demo recording
API Reference
As we know the server-side testing might be a bit difficult to grasp at first, we also have a generated API Reference for the SDK here.
Demo recording
We also have a small Demo available for you to watch, split in 4 short recordings, which includes the steps mentioned above, as well an example.
Part 2 – SDK Installation & Setup