The integration with Microsoft Clarity allows customers to collect additional data about sessions where their experiments were applied.
At the moment, the integration tracks:
- A/B experiment views
- Interaction views
- Survey views
The events are “tracked” using Clarity custom tags and events.
Custom tags
A/B and Interaction experiments
JSON
  {
      "key": "Omniconvert Experiment Id #{experiment_id}",
      "value": "{experiment_name}"
  }
Where experiment_id and experiment_name are the actual experiment’s ID and Name.
JSON
  {
    "key": "Omniconvert Variation Id #{variation_id}",
    "value": "{variation_name}"
  }
Where variation_id and variation_name are the actual variation’s ID and Name.
Survey experiments
JSON
  {
    "key": "Omniconvert Survey Id #{survey_id}",
    "value": "{survey_name}"
  }
Where survey_id and survey_name are the actual survey’s ID and Name.
Custom events
- Omniconvert Experiment Id #{experiment_id}
- Omniconvert Experiment Name {experiment_name}
- Omniconvert Variation Id #{variation_id}
- Omniconvert Variation Name {variation_name}
- Omniconvert Survey Id #{survey_id}
- Omniconvert Survey Name {survey_name}
How to start tracking with Clarity integration
- Go to the “Integrations” settings page
- Scroll down to the “Microsoft Clarity” integration
- Turn the switch button on and press the “Save” button

Once the intergetion is on you shuold start recieving custom tags and events in your Clarity Dashboard. Keep in mind that dashboard data refresh takes up to 2 hours.
Filter data by custom tags
After you have received the first custom tags you can use them to filter dashboard and heatmap data. To do that you have to:
- Open your dashboard/heatmps
- Click the “Filters” button
- Go to the “Custom filters > Custom tags” section
- Select your target tag and its value
- Click the “Apply” button


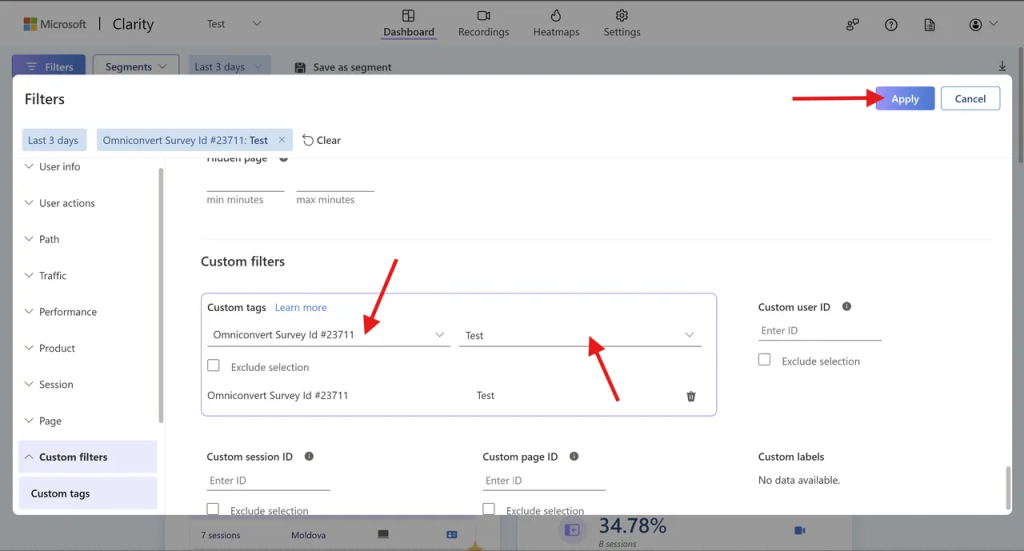
The same flow works for heatmaps as well.
Filter data by custom events
To filter dashboard/heatmap data by custom events you have to navigate to the “Smart events” section in your dashboard and select your target events there.

Alternatively, you can set the “custom events” filter under the “Filters” tab.
- Click the “Filters” button
- Go to the “User actions > Smart events” section
- Select your target events and click the “Apply” button


The same flow works for heatmaps as well.